
blog fail carnitas
Every day we talk to our clients about the benefits of content creation, engaging in social media, finding your voice, and all of the other potential actions one can perform to build out their online presence. This conversation always comes with the disclaimer that in order to be truly successful, which in our interpretation relies heavily on personal fulfillment, one should only put in the effort with tasks that they actually enjoy and can be consistent with. SEO and digital marketing are things that you can do night and day, around the clock, indefinitely. Often times you’re up against competitors that are (perhaps more committed to marketing than they are to their craft), so it’s important to build a strategy with balance. One that keeps you doing the things that you love.
We actually really enjoy blogging. It gives us the opportunity to share our personalities and the things that we love both inside and out of work. We unfortunately have done a very, very bad job of being consistent with it this year. We hope to make more time for it going forward.
During one of our first #SEOBBQ slowcooker adventures last year we made some carnitas which have since become the tacos of legend. Our friends ask us for the recipe all the time, or invites for when we decide to cook them again. To make up for our failure to blog as of late we’d like to share with all of you; our family, friends, clients, supporters, fans of tacos, crockpots, keto diets, and fun, our legendary slow-cooked carnitas recipe.
Cheers,
You will need:[separator_small color=’545454′ thickness=’1′ up=’5′ down=’5′]

[unordered_list style=’arrow’]
- 5 pounds of pork shoulder/butt/whatever
- 1 white onion, chopped
- A handful of peppers
*Your pepper selection is the key to the flavor profile here. We recommend a mix of sweet and hot peppers, but sometimes you’re stuck with whatever’s in season. If you’re not sure, cook by color, picking out an assortment that at least looks visually appealing. For this batch we had on hand: 1 large jalepeño, 1 Anaheim chile, and 1 poblano (which was, typically, mislabeled as a pasilla). - 1 half-dozen-ish garlic cloves
- 1 orange
- 1 lime (optional)
- 3 tablespoons Olive Oil
- 2 teaspoons Dried Oregano
- 1 teaspoon Cumin
- Fresh ground black pepper
- More salt that you think you need
[/unordered_list]
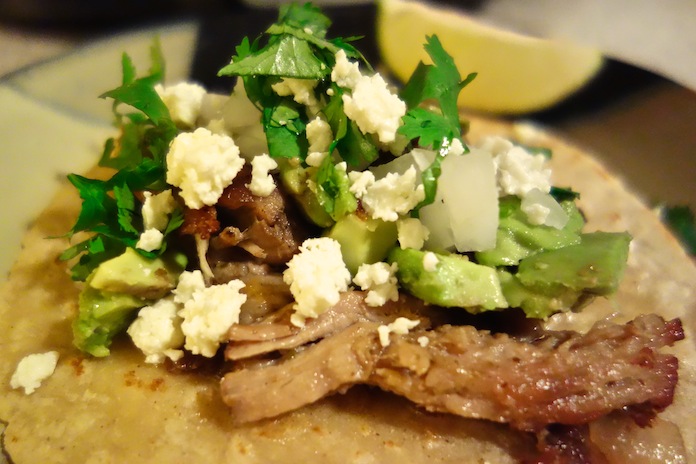
Additional taco fixin’s:[separator_small color=’545454′ thickness=’1′ up=’5′ down=’5′]

[unordered_list style=’arrow’]
- Avocado. We’re in California, honey, we put avocado on everything.
- Cilantro
- Onion
- Tortillas
- Cotija cheese
- Beer with lime & a shot of tequila
[/unordered_list]
The Recipe:[separator_small color=’545454′ thickness=’1′ up=’5′ down=’5′]
[ordered_list]
-
Get that pork to room temperature and rubbed down with a generous amount of salt and fresh pepper. Then pop into the crockpot, set for 6 hours at low heat.
*For faster cooking and more flavor absorption you may opt to cut this bad boy into two slabs of equal thickness.
-
Mix together your 3 tablespoons Olive Oil, 2 teaspoons Dried Oregano, 1 teaspoon Cumin, and drizzle over the pork in the crockpot. Feel free to experiment and add in some spices of your own.

-
Chop up that white onion and add to the crock.

-
Finely chop your garlic cloves and toss in on top. By ‘finely chop’ we mean slap with the broad side of a cleaver.

-
Dice up your peppers being extra careful not to rub your eyes like we did. Beers are recommended for this step… and all steps.
*Optional but highly encouraged flavor-profile-enhancing step 5.b:
Before adding peppers to crockpot, place in frying pan with a little olive oil at high heat until blistered.

-
Orange and lime next. Really the juice is all you need, but the skins bring the oil and with that a little touch of bitterness to the sweet, salty, and spicy thing we got going on here.

-
Let it cook. Here’s how it will be looking at start:

At about half way through not much has changed:

During the final couple of hours the real magic starts to happen, here we are at near completion, after a flip and stir:

Often people seem to think that with slowcooking the longer the better, we disagree. We think that you should slowcook until desired tenderness has been reached, and not a moment longer. Otherwise you are in danger of entering the mushy zone. When done the pork should flake off with little resistance to a twist of the fork. Because of the nature of the cut some areas will fall apart with ease, and others will be tougher. A little bit of pink tenderness is definitely desired. 6ish hours on low usually gets you there.Most recipes, at this point, say to break up the meat with a fork, fry it in lard or braise, and drip a little juice back in for moisture. Again, we disagree. Here’s how we proceed.
-
With some tongs gently pull the meat out and place into a bowl. In a separate bowl strain out the juices and set aside. Keep the crockpot on ‘warm’.
*Make sure to grab all the little bits of meat in the strainer and add them to the juice, if some of the peppers and onions come along that is totally OK.

-
Grab whatever pieces of fat you see dangling off the meat or in the strainer and place them in your frying pan at high heat. No need for lard. Break off large-bite pieces of the pork with tongs and begin frying them up in batches. Return fried pieces to the crockpot. We don’t really like to fully shred the meat at this point, or ever. The large chunks keep the moisture and tenderness locked inside the crispy exterior.

-
Once the frying is done toss your carnitas with another generous sprinkling of salt and begin sampling. Things should be at about 80% deliciousness. Lesser men would stop here, but we’re going all the way.

-
In your now empty-but-still-hot frying pan pour in the juices and let simmer down till it begins to thicken… maybe 20 minutes at high heat? 30? Keep sampling the product and let it reduce a little longer.
Before:

After:

-
FINALLY, mix the juices in with the carnitas and bask in the glory.

The result should be at the same time meaty and tender, as well as burnt and crispy. Moist but not swimming, with a complex but not overwhelming flavor. Basically the best carnitas you’ve ever had.
Make tacos, invite everyone, pour one out for your homies.
No thanks necessary. We love you.
[/ordered_list]